Monday, August 2, 2010

a collection for my aunt donna.

i had big dreams of posting about this when i was actually in florida, but i was too busy sunbathing, hanging out with my family, eating junk food, sleeping, and meeting local celebs that i never found the time to do it. so here is a belated post that is near and dear to my heart:

my aunt donna is a very special person to me. she is one of the most hospitable people in the world -- a person who just radiates love for everyone she meets. she takes a genuine interest in people, which is probably why she has so many loved ones in her life!

(here she is, modeling a hair treasure)

it has been a hard year for her. first her mother-in-law (my mema) passed away, and then her mother passed away. even in the midst of this painful time, she has still managed to remain the same aunt donna we all know and love, which is a gift.

as a special project, she sent me some of her mother's jewelry and a list of family members (sisters, nieces, and grand-nieces on her side that i've never met), and asked me to create hair treasures for each of them.

(some last-minute crafting in our seaside condo before the big delivery.)

she sent me a list of names (and ages) and assigned specific pieces of jewelry to specific people, along with pictures of everyone. her descriptions were really helpful, and it was fun to try to design pieces based on such little information. according to aunt donna, i hit the nail(s) on the head!

(going through the pieces with aunt donna for the first time)

i'm so glad that i was able to do this project for my aunt donna. she told me multiple times that she will treasure these pieces forever, and it warms my heart to know that i had a part in preserving her mother's jewelry in a unique, creative way. here are all the hair treasures i made as a part of this collection:


family is the most important thing in my life. i hope the same is true for you. tell your family you love them today, and go visit them sometime soon if they live far away. they miss you!

Thursday, July 22, 2010

breading's boutique.

i am lucky to work in a place where i consider not only my co-workers my friends but also many of the customers. "regulars" have a way of brightening my day by saying hi and knowing bits and pieces about my life, always asking how things are going. i definitely look forward to seeing them on a daily basis.

jim is one of those "regulars" who comes in every day and is super friendly! he works across the street at cripe photography (where i got this senior picture taken over 8 years ago) :
(class ring. beaded necklace. corduroys. kate hudson hair. long live 2002.)

a while ago jim asked me to make some special pieces for his daughters, and they ended up being some of my favorite little girl headbands! the other day he told me about his sister's store, breading's boutique.


she has a brick-and-mortar shop in warsaw, IN, and a few things listed online, as well. from what i can tell, there are some really cute dresses and tops! the store also carries merle norman cosmetics and other gifts. jim gave his sister some information about hair treasures, and now there is a link to the hair treasures etsy store on the breadings boutique page. sweet! 

maybe someday i'll have some treasures for sale in her store or through her online shop. i love being a part of small businesses and definitely appreciate small business owners. (speaking of --  hair treasures have been selling really well at ceramic dreams in broad ripple, IN! i need to get over there to restock soon!) 

*     *     *
tonight i finished a special project for my aunt donna that i will post about while i'm in florida. i'm leaving saturday for five glorious days with my family. 
sun. pool. beach. rest. sigh. 


Wednesday, July 14, 2010

some home decor projects.

i've been going back and forth from hair treasures special orders and home decor projects for my own personal enjoyment. i'm getting more and more excited about moving to bloomington for grad school, and i am doing as much as i can now to make my new place as homey as possible.

to add some color, i decided to cover some canvases and old (ugly-ish) picture frames with different fabrics. it's a really easy, cheap way to brighten up an entire wall in your living room or bedroom:
(i'm planning on a few more in green and pink [ugh] to tie in more of the colors in my rug.)

the red peonies -- be still my beating heart. the leaves have the appearance of brown tweed. sigh.

once i have all of the frames and canvases completed, i'll arrange them on my living room wall in some sort of collage. (no photos in the frames, by the way.)

pillow time! after searching for pillows at various stores, i decided that i'd just make my own and save a few pennies. i love these calicos:

corner close-up:

here's the back. it's sort of hard to see with this print, but there is an opening to make the case removable.
(here's a little tip for all you future pillow case makers: it's way easier to make a removable case than sewing it "onto" the pillow, permanently sealing it in. give it a try!)

here's a little shabby chic pink & green pillow with rounded edges. (i'm not a fan of pink, but i think this print is cute.)

corner close-up:
this case is removable, too. it was really misshapen in the beginning (unsolved mystery), but sewing the line to create a half-inch trim made it look much better.

after realizing that i am a failure at choosing and arranging decent silk flowers, i decided to make some of my own fabric flowers. here's a little arrangement:

just sew a couple of yo-yos made from your favorite fabric, top it with a yellow button, give it a felt backing and a pipe cleaner stem. and voila! an adorable fabric flower boquet!

that's all i have for now. it's fun for me to go back and forth between different projects. variety is the spice of life, right? i think i'd like to start an etsy home decor shop for little goodies like these. maybe not in the near future, but it would be fun someday. 

i have about a week to finish a very special hair treasures project for my aunt donna, which i will share in the next few days. i even get to hand-deliver them to her in florida! vacation! 

i wish you a happy house and a happy heart. 


ps. i recently udpated my etsy shop and re-listed some fun treasures. take a look!


Thursday, July 8, 2010

piper's wedding collection.

ah! i'm so excited about this post. i have finally finished piper's wedding collection, and i am handing it off to her tomorrow.

this collection has been fun for me from start to finish. i started out with her bridesmaids at a party where they designed their own pieces. then piper sent me a picture of what she wanted, so i had a very specific assignment. now all she needs is a wedding!

the entire bridal party collection (9 bridesmaids and 3 flower girls) : 

6 bridesmaids wanted alligator clips. all of their dresses are different colors, and each girl "designed" her own piece.

a back view of the alligator clips:

two girls chose bobby pins. simple and sweet!

one bridesmaid chose a headband that was already made. yellow was a popular color amongst the girls:

the three flower girls' headbands (tulle rosettes with feather "leaves") :

piper's bridal piece:
(a deconstructed -- and reconstructed -- purple silk flower with a border of polka dot feathers, topped with a piece of vintage embroidered lace, pearls, and a chute of purple feathers. the reverse birdcage veil is special-order russian netting.)

the back: 
(backed with felt and an extra large alligator clip for added security during the big day)

and just to compare, this is the original photo piper gave me. i was on a mission from the start!

here is my lovely sister sporting piper's bridal piece. i think it's pretty close to the original!

a view of the reverse birdcage veil from the back. it will look great in piper's dark hair!

a couple more close-ups of piper's bridal piece:


piper's wedding is in august, and i am really happy for her! she can finally give these gifts to her bridal party and get to the rest of the finishing touches before the big day. i hope to receive some professional photos after the wedding, and i'll definitely post them here! 

thanks for taking a look at this most recent collection, and -- as always -- let me know if you or anyone you know is in the market for some handmade wedding treasures. these are my favorites to do! 

Thursday, July 1, 2010

miscellaneous, etc.

this is my friend andy. my friend (his wife) beth ordered some treasures during the super duper ultra mega sale, and i think andy got a little jealous, so he turned to thievery. (let it be known that i am not opposed to starting a line for men.) 

this is a little guy i made for my friend mindy. one of her friends recently had a baby, and mindy sent her the cutest baby-sized kimono and this baby treasure. precious.

i made this frame for my friend morgan and her new husband andrew. they just got married at the end of may, and i couldn't be happier for them. unfortunately, i wasn't able to make it to their wedding, so they received this gift via mail.

i ordered some fabrics from a few different suppliers on etsy, and this owl print is one of them. i found this square frame at my new favorite antique / consignment shop, Favorite Finds.

Sunday, June 27, 2010

my lamp shade tutorial.

for a while now, i have been on an endless, fruitless search for a floor lamp for my new place. just when i had almost given up hope and resolved to go to target for a brand new one -- i stumbled upon Carmel, Indiana's best kept secret: Favorite Finds.

this adorable treasure trove is just a couple miles from my house. who knew? it's a consignment / antique shop full of rooms galore, stuffed full of fantastic old stuff from floor to ceiling. the owner is a funny older lady who has owned the shop for 17 years and can rattle off facts about everything in the place. i loved it!

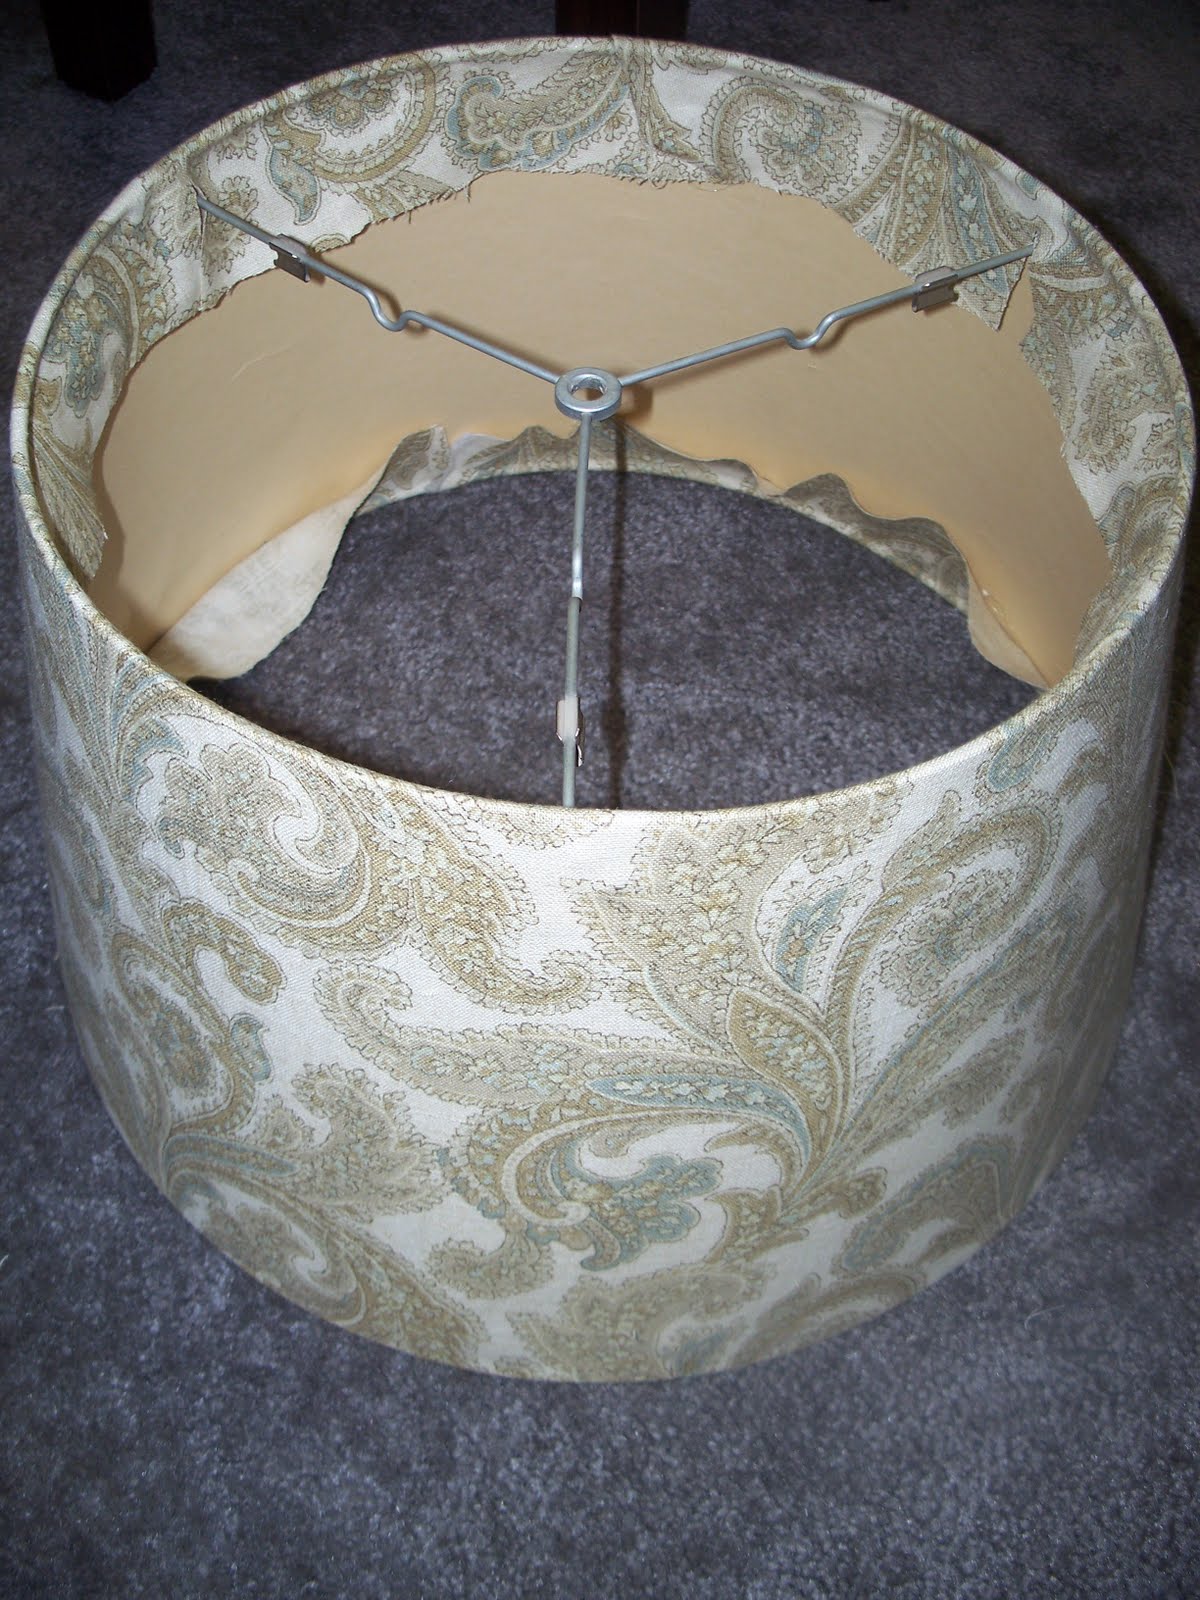
i found this old floor lamp for a measley $15. small price to pay for what i could tell was a good quality lamp. here it is in its original state:


clearly the shade needed some love, and i had a little to give. here's a little tutorial in case you ever find yourself in a similar situation: 

first: choose your favorite fabric. (i bought one yard of clearance upholstery fabric for $3.50.) cut a piece to wrap around the shade, including a couple extra inches of in length that will fold over the top and bottom of the shade. 
(because most lamp shades are smaller at the top than they are at the bottom, your fabric won't lie straight as you wrap it around. because of that, i wouldn't suggest anything with stripes or a pattern that needs to be arranged in a certain direction.)

 after you cut your strip, wrap your piece of fabric around the shade. using hot glue, glue one edge of the fabric to the shade as an anchor, and after wrapping the rest of the fabric around (pulled tight), glue the other edge to the lamp. 
(make your outside edge clean by folding it under and gluing it before you secure it to the shade.) you will have extra fabric around the top and bottom of the shade in varying amounts after you finish this step.

next: cut the extra fabric from around the top and bottom of the shade so that you leave about 2 to 3 inches of fold-over fabric. using hot glue, glue the excess fabric to the inside of the shade.

this is what will really keep the shade in place, so put the glue around the brim and make sure the fabric is pulled tight. (also: if your shade is like mine, you will need to cut some slits where the "support beams" are.)

now for the inside: i used plain white poster board, and it worked out pretty well, but it was kind of a pain. again, because of the shape of most shades, a straight strip of poster board won't work. notice how i had to arrange mine so that i could roll the shade from one end to the other and trace the shape. 
unfortunately, i forgot to photograph the piece i cut, but it will look like a "U" shape with a very wide curve. (you will probably have to trim the piece you cut so that the poster board doesn't peak out from the inside. i found this process to be more difficult than i had originally anticipated, but it worked.)

the end result should look something like this. i had to cut a couple extra pieces because my two poster boards ended up being a little too short. but after piecing them together, the inside is covered, and all of the rough edges of the fabric are covered.


that's all for the shade! i hope my tutorial made sense and that you will be confident if you ever stumble upon your own town's best kept secret. 

here's the finished product (all for less than $20) : 


this project was a fun process and one that i plan to duplicate in the near future with another lamp. my original plan was to spray paint the lamp post, but after some consideration, i decided to keep it in its original form -- the oldtimey bronze-ish color. it goes well with the shade. i like it, and i can't wait to put it in my new abode!